
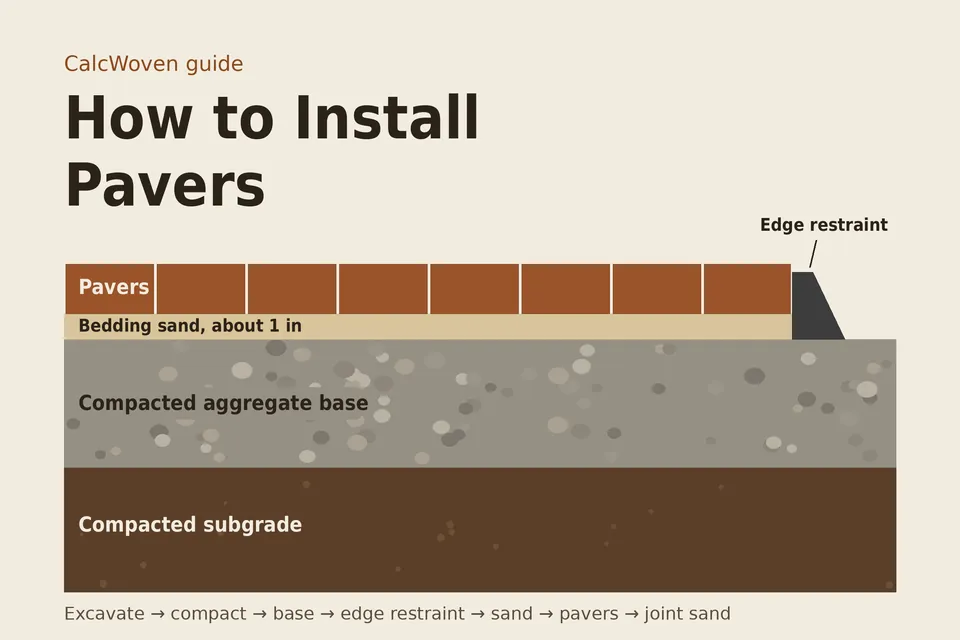
Installing pavers is mostly about what happens before the pavers go down. A good base, correct slope and solid edge restraints matter more to how the patio, walkway or driveway holds up than the pavers themselves. This guide walks through the standard sequence used by professional installers, based on guidance from the Interlocking Concrete Pavement Institute (ICPI), now part of the Concrete Masonry & Hardscapes Association (CMHA).
Before you start, use the Paver Calculator to work out how many pavers you need, and see paver base depth for how deep to dig for your project type.
What you’ll need
- Pavers (plus 5–15% extra for cuts and waste)
- Compactable aggregate base material
- Bedding sand (coarse, washed sand — not play sand)
- Joint sand (polymeric sand is a common choice for better joint stability)
- Edge restraints (plastic, metal or concrete) and spikes or anchors
- Landscape fabric/geotextile (optional, site-dependent)
- Plate compactor
- Shovel, rake, hand tamper, rubber mallet, string line and stakes, level, screed rails or pipes, broom, paver cutter or wet saw
Step 1: Plan the layout and call before you dig
Mark out the project area with stakes and string or marking paint. Decide on the paver pattern now, since it affects how much cutting you’ll do at the edges. In the United States, call 811 before you dig to have underground utility lines marked.
Step 2: Excavate
Dig out the area to the full depth: base thickness, plus bedding sand, plus paver thickness. For a typical patio with a 4-inch base, 1-inch bedding layer and a 2⅜-inch paver, that’s roughly 7⅜ inches total; a driveway with a 6-inch base is roughly 9⅜ inches. See paver base depth for depth by application and site conditions. Excavate a few inches wider than the finished edge so there’s room to install edge restraints.
Step 3: Compact the subgrade
Compact the exposed soil before adding any base material. ICPI’s construction guidance notes that compaction of the soil subgrade is critical to pavement performance and that poor compaction leads to settlement. If the subgrade is soft, wet or unstable, it may need to be corrected rather than built over as-is.
Step 4: Place and compact the base
Add the aggregate base material in layers (lifts) rather than all at once, compacting each layer before adding the next. Maintain the slope as you go, using stakes and a string line to check it. Set the finished base surface so it already follows your intended slope; bedding sand is not meant to correct an uneven base.
Getting the slope right
Water needs somewhere to go. ICPI Tech Spec 2 calls for a minimum longitudinal slope of 1% and a minimum cross slope of 2%, sloping away from buildings. Measure and set this slope from the compacted base, not just by eye from the finished surface, so the whole paver system drains correctly.
Step 5: Install edge restraints
Edge restraints hold the perimeter pavers in place and resist the forces of traffic and minor settlement; ICPI describes them as essential for trouble-free performance. There are two general types: manufactured restraints (plastic or metal, anchored with spikes) and restraints formed on site, such as a concrete curb. As a rule of thumb, the compacted base should extend beyond the restraint by about the same distance as the base’s thickness.
Step 6: Screed the bedding sand
Spread bedding sand (commonly about 1 inch, per paver base depth) and screed it level and flat using screed rails or pipes and a straight board. Work in small sections so you don’t disturb the screeded sand by kneeling or walking on it before the pavers are placed.
Step 7: Lay the pavers
Place pavers in your chosen pattern, working from a fixed edge or corner and following your string lines. Slide each paver down against its neighbor rather than dropping it in, to keep joint widths consistent. Don’t walk on the fresh bedding sand outside the pavers you’ve already placed. Save border cuts for last, marking and cutting pavers with a paver cutter or wet saw to fit the edge.
Step 8: Initial compaction
Once the field pavers and cut edges are in place, compact the surface with a plate compactor before adding joint sand. Industry guidance puts a patio or walkway compactor at roughly 4,000–5,000 lbf (about 18–22 kN) of centrifugal force; driveways may call for a larger, high-frequency compactor or a vibratory roller. Keep the compactor away from any unrestrained edge — guidance commonly cites staying back at least 6 ft until that edge is restrained. Use a protective pad under the plate if your pavers have a textured finish, to avoid scuffing.
Step 9: Sweep in joint sand
Spread joint sand over the surface and sweep it into the joints between pavers. The sand should be dry before this step and before final compaction. Polymeric sand (which hardens when activated with water, per the product’s instructions) is a common choice for better joint stability and weed resistance compared with plain sand.
Step 10: Final compaction and clean-up
Compact again to settle the joint sand into place, then sweep off any excess from the paver surface. If you’re using polymeric sand, follow the product’s specific instructions for misting or activating it with water — timing and method vary by product.
Common mistakes
- Skipping subgrade compaction, or compacting the base in one thick lift instead of layers.
- Using bedding sand to even out a poorly graded base.
- Skipping or under-sizing edge restraints.
- Getting the slope direction wrong, or measuring it only by eye at the finished surface.
- Compacting too close to an unrestrained edge.
- Letting joint sand get wet before it’s fully swept into the joints.
- Using playground or masonry sand instead of a proper bedding/jointing sand.
FAQ
Do I need edge restraints?
Yes, for a conventional installation. Edge restraints keep the perimeter pavers from spreading under traffic and settlement over time.
How much slope do I need?
ICPI’s minimum guidance is 1% slope along the length of the pavement and 2% across it, directing water away from structures.
Can I install pavers without a compactor?
Compaction is part of how the system reaches its designed strength and stability. A plate compactor is standard equipment for this job; most home improvement rental counters carry them.
How many pavers and how much base material do I need?
Use the Paver Calculator: it estimates your paver count, and its optional base and bedding-sand fields estimate those material volumes from the same project area.
Sources
- ICPI Tech Spec 2: Construction of Interlocking Concrete Pavements
- CMHA: Proper Concrete Paver Base and Depth
This guide covers a conventional dense-graded paver installation. Permeable paver systems use different materials and layer requirements. For structural, commercial or difficult-site installations, follow a manufacturer’s or engineer’s specification. Results and steps here are for general guidance; your specific product may have additional instructions.
Leave a Reply